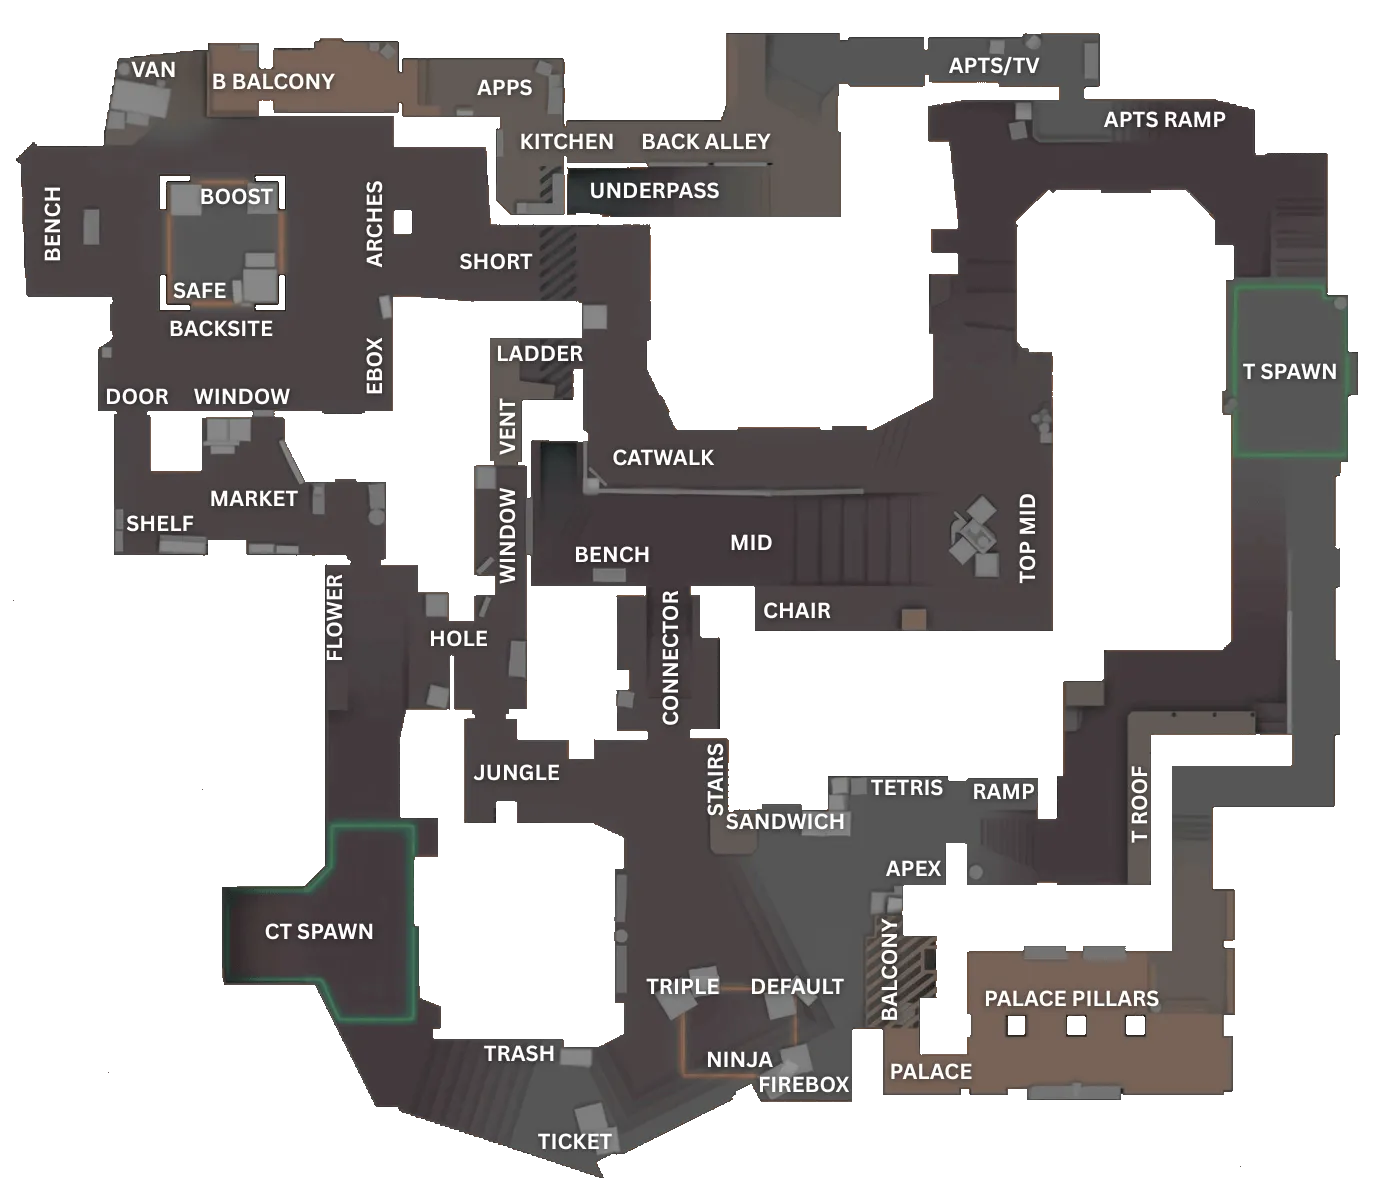
Mirage Callouts
Mirage (de_mirage) is a popular Counter-Strike map set in a Moroccan city, designed for the bomb defusal game mode. Featuring open Mid, tight apartments, and iconic sites like A and B, it rewards smart team play, map control, and effective grenade usage in competitive matches.

Mirage Overview
Mirage is a map with a three-lane layout featuring two bombsites and a central Mid area that connects the map together. While players can rotate through both CT and T Spawn, Mid remains the most crucial control point for fast rotations. This map heavily rewards strong strategy, coordination, and effective utility usage.
This overview pairs best with learning the main callouts, understanding common CT and T setups, and practicing effective utility usage.
Characteristics
Balance
Generally a 50/50 balance between CT and T sides
Win Conditions
Strong utility usage and coordinated team play
Mid Control
Extremely important for rotations and map control
Rotation Time
Moderate (~15 seconds)
Key Areas
A Site
Open bombsite with multiple entry points
B Site
More enclosed site with B Apartments as the main choke point
Mid
Central control area enabling fast rotations
Connector
Controls rotations between Mid and A Site
Palace
Elevated route that applies pressure to A Site
CT Spawn
Primary rotation hub between bombsites
Mirage Main Callouts
Learn the most important Mirage callouts for A Site, Mid, and B Site to improve communication, rotations, and round execution.
A Site
- RampMain A Site approach from T Spawn.
- ApexCovers Jungle and Stairs while defending A Site.
- BalconyOverlooks A Site, offering high-ground advantage.
- PillarsProvides cover inside Palace for ambushes.
- TetrisStacked boxes offering cover and angles in A Site.
- SandwichCorner with cover for hiding or ambushing on A Site.
- StairsPosition to hold Ramp and Balcony on A Site.
- JungleConnects Window to A Site, used for rotations.
- ConnectorLink between Mid and A Site.
- DefaultPrimary bomb plant spot on A Site.
- FireboxCorner near Default plant for cover.
- NinjaHidden spot in A Site for sneaky plays.
- TripleThree boxes providing cover and angles in A Site.
- TrashJump-up spot to surprise enemies on A Site.
- TicketHigh-ground vantage allowing CTs to see most of A Site.
B Site
- SafeCorner often used for planting or holding B Site.
- ArchesConnects B Site to Short and is key for rotations.
- EboxCorner for defenders to ambush attackers on B Site.
- DoorEntry from Market to B Site, used for rotations or pushes.
- WindowOverlooks B Apps, useful for crossfires or peeks.
- ShelfCorner to hide and ambush enemies in B Site.
- MarketRotation area between B Site and CT Spawn.
- CheckoutCorner inside Market providing sight into CT Spawn or B Site.
- VanGives cover and a boost point into B Apps.
- B BalconyOverlooks B Site, offering defensive high ground.
- B AppsTerrorist approach into B Site.
- KitchenPassage from Underpass to B Site for rotations.
Mid
- ShortPath from Mid to B Site for rotations and map control.
- HoleRotates between CT Spawn and Window.
- Window / SniperOverlooks all of Mid, ideal for holding angles.
- VentPassage connecting Short and Window for rotations.
- LadderProvides vertical access to Vent from Mid.
- CatwalkWalkway from Mid to B/Ladder for rotations.
- BenchJump-up spot to see Short or move into Window.
- MidCrucial rotation point throughout the map.
- ChairCorner used to hold Short in Mid.
- Top MidOverlooks Bottom Mid, important for rotations.
- Side AlleyConnects T Spawn to Mid for rotations and flanking.
Other
- BenchProvides cover for defenders and peeking angles.
- BoostGives vertical advantage for peeking or moving into B Site.
- Back AlleyOutside B Site, used for flanking or rotations.
- UnderpassTunnel connecting Mid to B Site.
- Apts / TVT Apartments area controlling A Site access.
- Apts RampSlope leading from Apartments into A Site.
- T SpawnStarting location for Terrorists.
- T RoofElevated T-side position for peeking or pushes.
- CT SpawnSpawn area for Counter-Terrorists and rotations.
- FlowerCorner that can be used to peek or hide tactically.
Mirage CT Strategy
Common Counter-Terrorist setups and positioning principles in Mirage to help you hold sites and win rounds.
2 A, 1 Mid, 2 B
Two players defend each bombsite while one player controls Mid from Window or Connector. This setup allows balanced site coverage while enabling quick rotations if a site comes under pressure. Mirage’s retake potential makes this strategy especially effective.
Pros
- Even Site Coverage – Both bombsites are defended by two players, providing strong initial resistance.
- No Isolated Defenders – Each site defender has a teammate nearby to trade or delay pushes.
Cons
- Retakes Often Required – Two defenders are usually not enough to stop a full five-player execute.
- Weaker Mid Control – A single Mid player can be overwhelmed by coordinated utility and pressure.
1 A, 2 Mid, 2 B
One player anchors A Site with support from Connector, while two players contest Mid and two defend B Site. This setup emphasizes Mid control and flexible rotations.
Pros
- Strong Mid Presence – Window and Connector crossfires make it difficult for Ts to gain Mid control.
- Flexible Rotations – Mid players can quickly support either bombsite.
Cons
- A Site Relies on Support – The solo A player can be pressured heavily if rotations are delayed.
- B Vulnerable to Full Executes – Two defenders may struggle against a well-coordinated B Apartments rush.
3 Mid Control, 2 Site Anchors
Three players focus heavily on Mid control while one player anchors each bombsite. This strategy aims to deny Ts map control early and force predictable site hits.
Pros
- Dominant Mid Control – Strong Mid presence limits T-side rotations and information gathering.
- Early Information – Aggressive Mid control can quickly reveal enemy intentions.
Cons
- Solo Site Anchors – Single defenders can struggle to delay fast site executes.
- Punishing If Mid Is Lost – Losing Mid control leaves both bombsites exposed.
Positioning & Rotations
Use crossfires between Ticket and Connector to stop Ramp and Palace pushes. Jungle AWP positions can control Palace effectively. Smokes and molotovs are key for delaying executes.
Delay B Apartments pushes with smokes and molotovs. Controlling Short allows defenders to assist Mid and A Site.
A powerful position to defend both Mid and A Site. Pairing with a Window player creates strong crossfires.
An excellent AWP position for controlling Mid and enabling fast rotations to both bombsites.
Effective retakes rely on coordinated utility usage and communication. B Site is generally easier to retake than A Site.
Mirage T Strategy
Common Terrorist setups strategies for attacking Mirage sites and starting powerful pushes against defending players.
A Site Smoke Execute
A coordinated smoke execute designed to block key CT sightlines and isolate site defenders.
Pros
- Cuts Critical Angles – Smokes deny vision from Jungle, Ticket, and Stairs.
- Strong Post-Plant Positions – Allows Ts to establish solid post-plant control.
Cons
- High Utility Requirement – Requires multiple smoke grenades to be effective.
- Execution Dependent – Poor timing or missed smokes can quickly ruin the execute.
B Site Execute
A fast-paced execute focused on overwhelming B Site defenders through Apartments and Short.
Pros
- Limited CT Rotations – B Site is far from CT Spawn, making rotations slower.
- Effective With Utility – Molotovs and flashes can easily clear common B positions.
Cons
- Choke Point Heavy – B Apartments can be difficult to exit against strong utility.
- Predictable – Repeated B hits are easy for CTs to adapt to.
Mid Control → A/B Split
A map control-focused strategy that prioritizes Mid before splitting onto either bombsite.
Pros
- Flexible Ending – Allows Ts to choose the weaker bombsite late in the round.
- Disrupts CT Rotations – Strong Mid control forces CTs into uncomfortable positions.
Cons
- Requires Coordination – Poor timing between split groups can fail the execute.
- Utility Intensive – Smokes and flashes are required to maintain Mid control.
Positioning & Rotations
Provides strong pressure onto A Site and powerful post-plant positions.
Key control area that enables rotations and split executions.
Allows safe movement into Mid or B Apartments while avoiding AWP angles.
Mirage Utility Usage
Key smoke and molotov grenade lineup spots on Mirage to control vision, block angles, and support your team.
CT Spawn Smoke
SmokeBlocks rotations from CT Spawn, essential for a clean A site execute.
Jungle Smoke
SmokeIsolates the A anchor in Jungle, preventing early picks and disrupting site defense.
Window Smoke
SmokeCrucial for controlling mid; blocks vision from Window to allow safe map control and rotations.
Apartment Stairs Molotov
MolotovDelays B rushes and damages defenders, softening the site for a coordinated push.
Van Molotov
MolotovClears common B site positions, forcing defenders off cover during executes.