Dust II Callouts

Dust 2 (de_dust2) is one of Counter-Strike’s most iconic bomb defusal maps, set in a desert town. Known for its simple yet balanced layout with key areas like Long, Mid, and B Site, it emphasizes strategic positioning, teamwork, and precise grenade usage in competitive play.

Unconfirmed
Bomb Defusal
Dust II view 1

Dust II Overview

Dust II is one of the most iconic and straightforward maps in Counter-Strike, featuring a simple layout with long sightlines and minimal vertical complexity. The map revolves around strong aim, early map control, and decisive executes. Mid and Long control are critical, as they dictate rotations and bombsite pressure throughout the round.

This overview pairs best with learning the main callouts, understanding common CT and T setups, and practicing effective utility usage.

Characteristics

  • Balance

    Historically T-sided, but balanced with strong CT utility

  • Win Conditions

    Aim duels, early map control, and decisive executes

  • Mid Control

    Important but less flexible than other maps

  • Rotation Time

    Fast between Mid and B, slower toward A Long

Key Areas

  • A Site

    Open bombsite with Long and Short as main entry routes

  • B Site

    Compact site with tunnels as the primary choke point

  • Mid

    Controls rotations and access to Short

  • Long

    Key control area that heavily influences A Site takes

  • Short (Catwalk)

    Elevated route from Mid into A Site

  • CT Spawn

    Central rotation point for site defenders

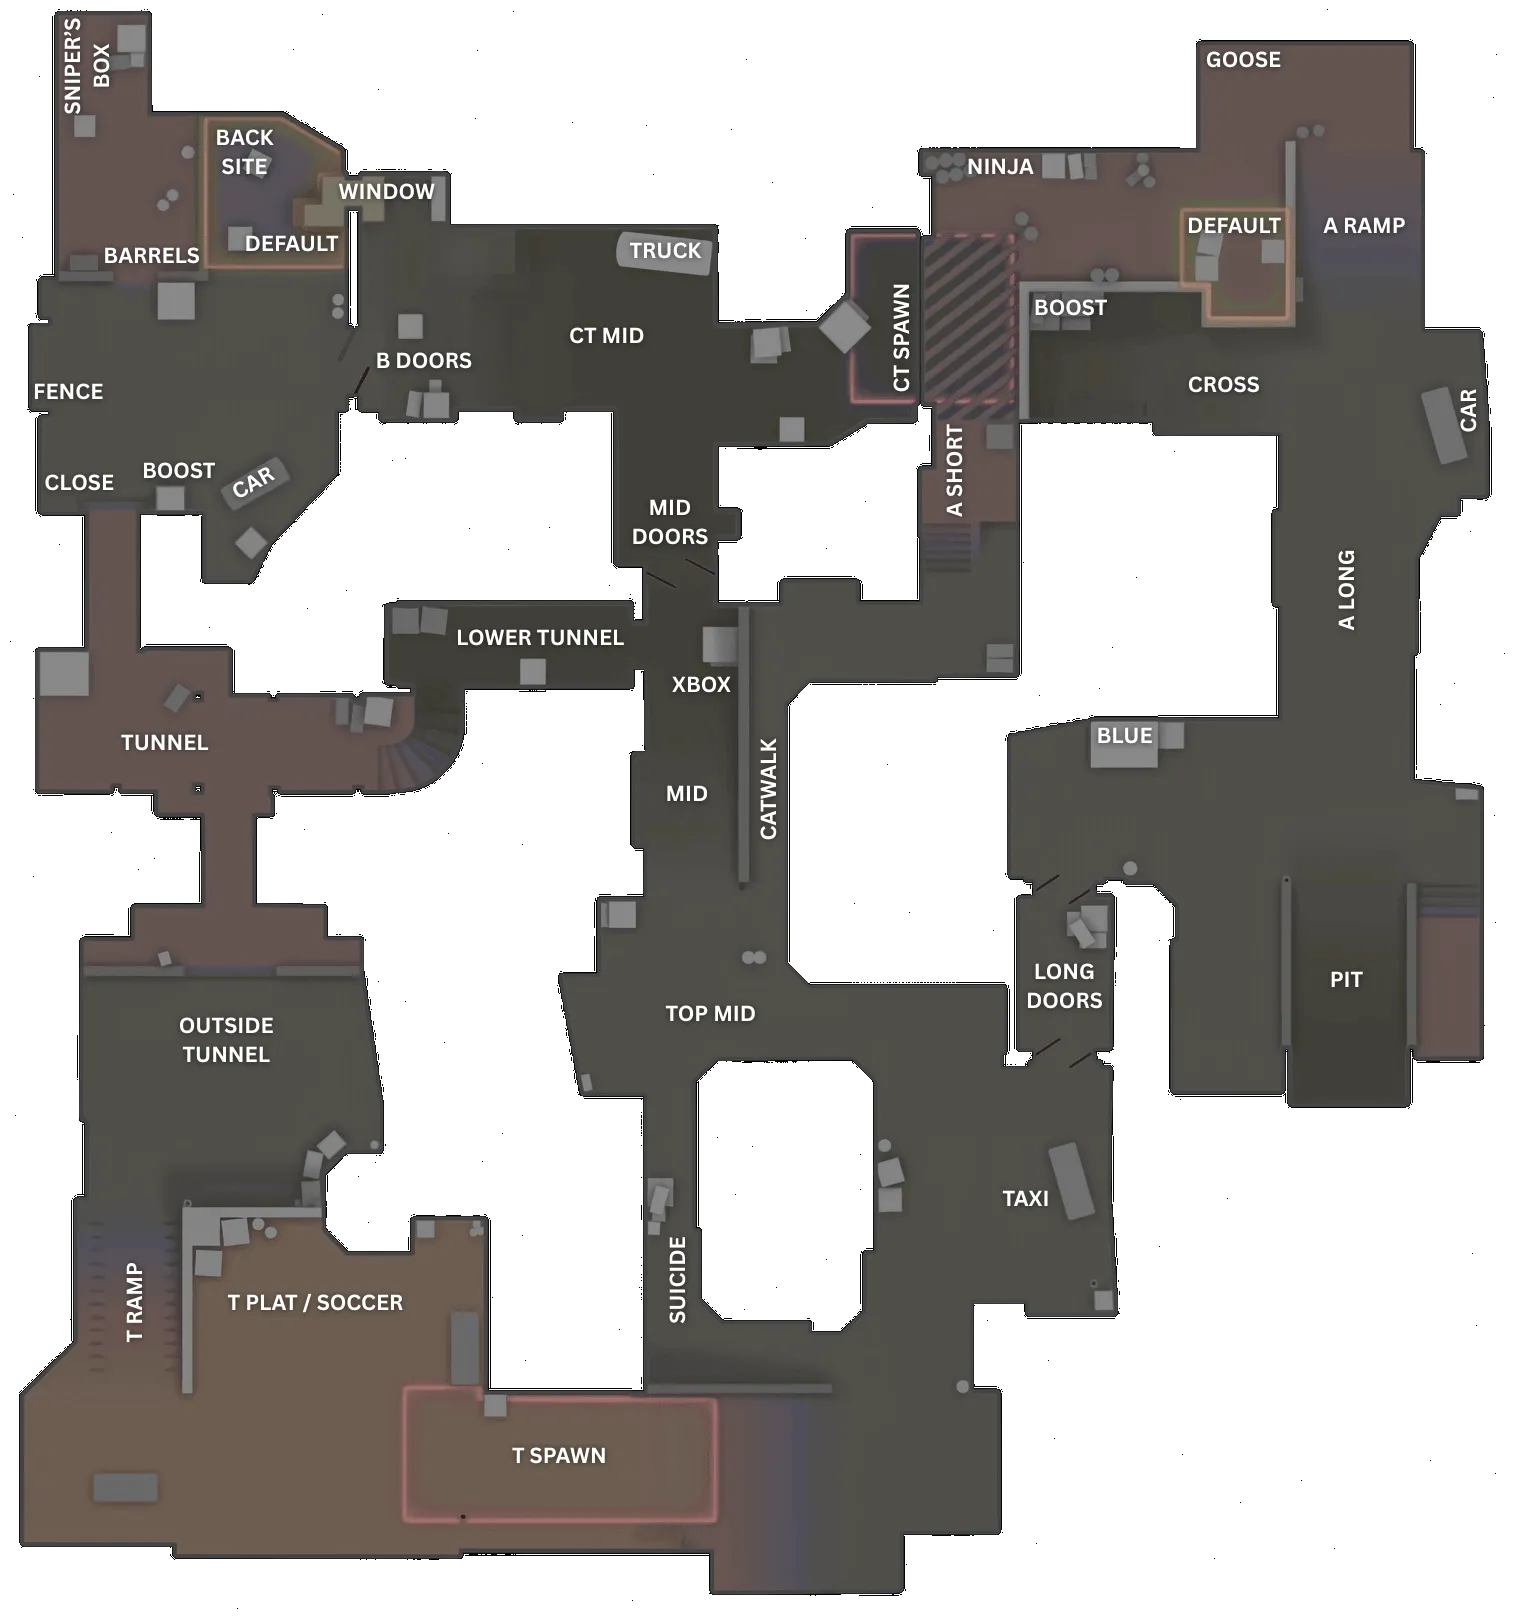
Dust II Main Callouts

Learn the most important Dust II callouts for A Site, Mid, and B Site to improve communication, rotations, and round execution.

A Site

  • A ShortPathway from Mid to A Site for fast pushes.
  • A StairsHigh-ground position controlling Short approach to A Site.
  • A ShortAlternate point along Short for A Site rotations.
  • BoostJump-up spot for peeking or moving onto A Platform.
  • ElevatorVertical cover and quick rotation near A Site.
  • CrossCrossroads area providing multiple angles into A Site.
  • NinjaHidden corner near A Site for sneaky plays.
  • A PlatRaised platform giving sightlines over A Site.
  • DefaultPrimary bomb plant location on A Site.
  • GooseCorner behind bomb site for cover and peeks.
  • BarrelsBoxes providing cover in A Site.
  • A RampMain approach from T Spawn to A Site.
  • A CarCover position near A Site for peeks or defense.
  • A LongLong pathway from T Spawn to A Site.
  • Long CornerCorner along A Long used for cover.
  • PitLow-ground position along Long providing cover.
  • Pit PlatRaised area near Pit offering sightlines.
  • Side PitFlanking position next to Pit on Long.
  • BlueCover box in Long area for Mid or A rotations.
  • Long DoorsDoorway along Long used for peeks and control.
  • Outer LongExtended Long area from T Spawn.
  • TaxiCorner on Long for cover and movement.

B Site

  • Sniper's BoxProvides cover and sightlines for long-range engagements.
  • B PlatRaised platform giving sightlines onto B Site.
  • Big BoxLarge cover in B Site for holding angles.
  • Double StackStacked boxes providing cover and sight advantage.
  • Back SiteCorner at the back of B Site used for defense.
  • DefaultTypical bomb plant spot in B Site.
  • FenceCover near B Site to peek or hide.
  • CloseCorner for holding B Site engagements.
  • BoostJump-up spot providing vertical advantage in B Site.
  • B CarProvides cover and position in B Site.
  • ClosetSmall corner in B Site for hiding or ambush.
  • DoorsEntryway from Mid to B Site.
  • WindowOverlooks B Site and B Apps.
  • ScaffoldingElevated position giving sightlines in B Site.
  • B BoxesCover boxes inside B Site.
  • Outer TunnelsT-side tunnels connecting to B Site.
  • Upper TunnelsHigher tunnel pathway leading toward B Site.
  • Lower TunnelsLower tunnel leading into B Site.

Mid

  • CT MidCT-controlled area connecting Mid to B Site.
  • TruckCover point in Mid for fights or rotations.
  • Mid DoorsDoorway connecting Mid and CT Spawn.
  • Close Mid DoorsCloser position near Mid Doors for peeks.
  • Top MidOverlooks Mid, important for map control.
  • Right Side MidPosition on Mid for peeks and rotations.
  • Barrels / PalmBoxes providing cover near Mid.
  • MidCentral rotation point for map control.
  • XBoxBox in Mid used for cover and peeking angles.

Other

  • CT SpawnSpawn point for Counter-Terrorists.
  • T SpawnStarting location for Terrorists.
  • SuicideCorner providing cover near T Spawn.
  • T Plat / SoccerRaised area used for mid and Long rotations.
  • T RampSlope leading from T Spawn into the map.

Dust II CT Strategy

Common Counter-Terrorist setups and positioning principles in Dust II to help you hold sites and win rounds.

2 A, 1 Mid, 2 B

Two players defend A Site, one controls Mid, and two anchor B Site. This is a standard and reliable setup that provides solid site coverage while allowing quick reactions to early T aggression.

Pros

  • Stable Site Coverage Both bombsites are defended with enough players to delay early pushes.
  • Clear Responsibilities Each player has a defined role, making communication straightforward.

Cons

  • Mid Pressure Risk A single Mid player can be overwhelmed by coordinated utility.
  • Long Control Dependent Losing Long early can heavily weaken A Site defense.
3 A Control, 1 Mid, 1 B

Three players focus on controlling Long and Short early, with minimal coverage elsewhere. This setup aims to deny A Site control and force Ts into Mid or B.

Pros

  • Strong A Denial Heavy presence makes taking A Site extremely difficult for Ts.
  • Early Information Aggressive A control quickly reveals enemy intentions.

Cons

  • Weak B Defense A single B defender can struggle against fast tunnel pushes.
  • Rotation Risk Rotations from A to B can be slow if Mid is blocked.

Aggressive Long Control

CTs aggressively contest Long early using utility and coordinated peeks to deny T-side space and momentum.

Pros

  • Map Control Advantage Winning Long gives CTs strong leverage over A Site.
  • Economy Pressure Early damage or picks can heavily impact T-side buys.

Cons

  • Utility Heavy Requires consistent use of smokes, flashes, and molotovs.
  • High Risk Losing Long early can leave A Site exposed.

Positioning & Rotations

A Site

Hold crossfires between Long, Short, and Site. Utility is critical for delaying executes and isolating entry players.

B Site

Use molotovs and smokes to control tunnels. Delaying pushes is often more important than getting kills.

Mid

Control Short access and gather information. Avoid overextending without support.

Long

Early utility and coordinated peeks are essential to contest Long control.

Retakes

Retakes rely heavily on flashes and coordinated pushes. A Site retakes are generally harder than B.

Dust II T Strategy

Common Terrorist setups strategies for attacking Dust II sites and starting powerful pushes against defending players.

A Site Long Execute

A classic execute focused on taking Long control and overwhelming A Site defenders with numbers.

Pros

  • Strong Post-Plant Positions Long provides excellent cover and post-plant angles.
  • Simple Execution Relies more on aim and timing than complex utility.

Cons

  • Utility Contest CT utility can heavily slow down Long takes.
  • Predictable Repeated Long hits are easy for CTs to adapt to.

B Site Tunnel Execute

A fast and direct execute through B Tunnels designed to overwhelm the site defender before rotations arrive.

Pros

  • Fast Timing Quick hits can catch CTs mid-rotation.
  • Low Complexity Simple to execute with minimal setup.

Cons

  • Choke Point Heavy B Tunnels can become deadly against prepared utility.
  • Limited Exit Routes Once committed, backing out is difficult.

Mid Control → Short Split

Ts take Mid control before splitting through Short and Long to pressure A Site from multiple angles.

Pros

  • Forces CT Rotations Mid control pulls defenders out of position.
  • Multiple Entry Points Splits make it difficult for CTs to hold crossfires.

Cons

  • Utility Dependent Requires smokes to cross Mid safely.
  • Timing Sensitive Poor synchronization can cause the split to fail.

Positioning & Rotations

Long

Critical area for A Site pressure and post-plant control.

Top Mid

Controls access to Short and limits CT rotations.

B Tunnels

Primary staging area for B Site executes.

Dust II Utility Usage

Key smoke and molotov grenade lineup spots on Dust II to control vision, block angles, and support your team.

CT Spawn Smoke

Smoke

Blocks CT rotations onto A site from CT Spawn, giving Ts a safer site execute.

Long Smoke

Smoke

Isolates defenders holding Long, allowing Ts to cross safely and take control of the area.

Short Cross / Xbox Smoke

Smoke

Provides a safe Catwalk crossing by obstructing CT vision from Short.

B Window Smoke

Smoke

Essential for a B take, blocks defenders peeking from window positions.

Goose Molotov

Molotov

Clears the common Goose anchor on A site, forcing defenders out of position.