Your crosshair is the most critical visual element in Counter-Strike 2. It's the focal point of your aim, the center of every engagement, and can be the difference between securing the kill or losing the duel. Whether you're a beginner looking for a reliable starting crosshair or a seasoned player fine-tuning your setup, understanding how to import, customize, and optimize your crosshair is essential for competitive success.
The right crosshair can improve your target acquisition speed by 15-30% and significantly boost your confidence in aim duels. Even small adjustments can have measurable impacts on your performance.
Table of Contents
- •Why Your Crosshair Matters in CS2
- •Understanding Crosshair Types
- •Crosshair Settings Explained
- •Finding Pro Player Crosshairs
- •Method 1: Import via Share Code (Recommended)
- •Method 2: Import via Console Commands
- •Using the In-Game Crosshair Editor
- •Advanced Crosshair Customization
- •Crosshair Color Psychology
- •Creating Your Perfect Crosshair
- •Saving and Sharing Your Crosshair
- •Testing Your New Crosshair
- •Common Crosshair Mistakes to Avoid
- •Troubleshooting Crosshair Issues
- •Closing Notes
Why Your Crosshair Matters in CS2
Your crosshair is more than just a visual indicator—it's a precision tool that directly impacts your accuracy, reaction time, and overall confidence in gunfights. Professional CS2 players spend hours perfecting their crosshair settings because they understand that even minor adjustments can translate to competitive advantages.
Key benefits of an optimized crosshair:
- •Improved target acquisition: A well-designed crosshair helps you quickly locate and track enemy heads
- •Better pre-aim consistency: Clear crosshair visibility ensures your pre-aim positioning is always accurate
- •Reduced visual clutter: The right size and style prevents your crosshair from obscuring enemies at critical moments
- •Increased confidence: Knowing your crosshair works for you psychologically improves your decision-making in duels
Studies in competitive gaming show that players with optimized crosshairs can improve their headshot accuracy by 10-20% compared to using default settings. The crosshair acts as your brain's anchor point for muscle memory, making consistency in aiming fundamentally easier when you have a crosshair you trust.
Different playstyles also benefit from different crosshair configurations. AWPers often prefer dot crosshairs for maximum precision, while riflers might choose a classic four-line crosshair with a small gap for balanced visibility and accuracy. Entry fraggers frequently use static crosshairs for predictable aiming, while support players might prefer dynamic crosshairs that provide movement feedback.
Since Counter-Strike 2's release on Steam, crosshair customization has become even more refined with improved visual clarity and expanded settings options. The Source 2 engine provides better rendering for crosshairs across all resolutions, making precise customization more important than ever for competitive play.
Even professional players regularly adjust their crosshairs. It's not about finding the "perfect" crosshair, but rather finding what feels comfortable and confident for your current playstyle.
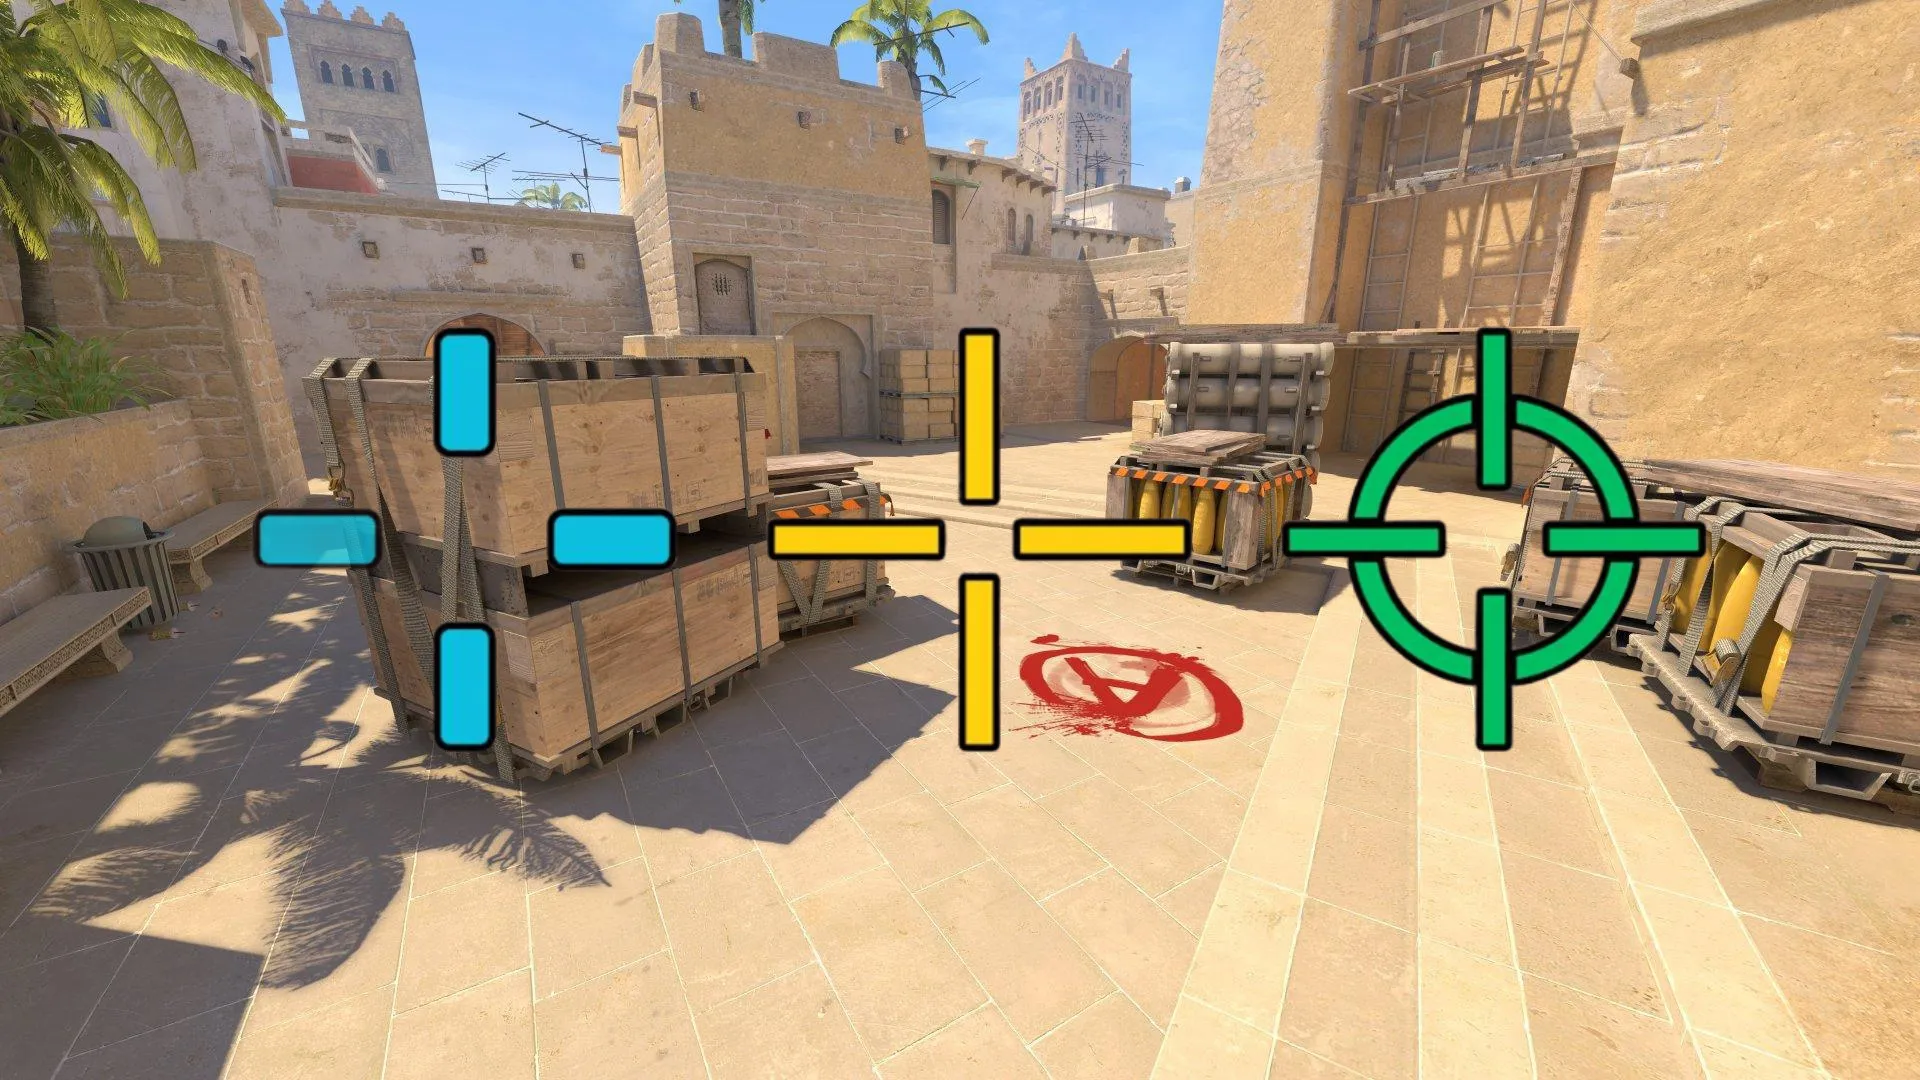
Understanding Crosshair Types
CS2 offers several distinct crosshair styles, each with unique characteristics suited to different playstyles and preferences. Understanding these types helps you make informed decisions when choosing or creating your crosshair.
Static Crosshairs
Static crosshairs remain fixed in size and shape regardless of movement, shooting, or weapon state. They provide consistent visual feedback and are the most popular choice among professional players.
Advantages:
- •Predictable aiming reference point
- •No visual distractions during sprays or movement
- •Easier to develop muscle memory
- •Cleaner visual appearance
Best for: Players who want maximum consistency and already have strong spray control knowledge.
Dynamic Crosshairs
Dynamic crosshairs expand and contract based on movement accuracy, weapon recoil, and firing. They provide real-time feedback about your current accuracy potential.
Advantages:
- •Visual indication of movement accuracy
- •Helps beginners learn spray patterns
- •Shows when you're moving vs standing still
- •Useful for teaching counter-strafing
Best for: Newer players learning movement mechanics and anyone who wants visual accuracy feedback.
Dot Crosshairs
Dot crosshairs consist of a single pixel or small dot in the center of your screen. They're minimalist and provide maximum visibility around the aiming point.
Advantages:
- •Maximum screen visibility
- •Extremely precise aiming point
- •No visual clutter whatsoever
- •Popular among AWPers and precise aimers
Disadvantages:
- •Can be hard to see on certain backgrounds
- •No reference for spray control
- •Requires strong crosshair placement habits
Best for: AWP players, precise aimers, and experienced players with excellent crosshair placement.
Classic Four-Line Crosshairs
The traditional crosshair style with four lines extending from the center. This is the most versatile and customizable option, allowing extensive adjustments to size, gap, thickness, and more.
Advantages:
- •Highly customizable
- •Clear center point
- •Provides spray control reference
- •Works well for all weapons
Best for: Most players, especially riflers and all-around players who need versatility.
Comparison Table
| Crosshair Type | Precision | Visibility | Learning Curve | Pro Usage |
|---|---|---|---|---|
| Static Classic | High | Excellent | Low | 65% |
| Dynamic Classic | Medium | Good | Very Low | 15% |
| Dot | Very High | Limited | Medium | 15% |
| Hybrid (Dot + Lines) | High | Excellent | Low | 5% |
Don't be afraid to experiment with different types. Many professional players have switched crosshair styles multiple times throughout their careers before settling on their preferred setup.
Crosshair Settings Explained
Understanding each crosshair setting gives you complete control over your aiming reticle. CS2 provides extensive customization through console commands that control every aspect of your crosshair's appearance and behavior.
Essential Crosshair Commands
cl_crosshairsize
Controls the length of each crosshair line extending from the center point.
- •Range: 0 to 100
- •Default: 5
- •Typical: 2-6
- •Impact: Larger sizes provide more reference but can obscure targets
Recommendation: 3-5 for most players. AWPers often use 1-2 for minimal obstruction.
cl_crosshairthickness
Determines how thick each line of your crosshair appears.
- •Range: 0 to 10
- •Default: 1
- •Typical: 0.5-2
- •Impact: Thicker lines are more visible but take up more screen space
Recommendation: 1-1.5 provides good visibility without excessive clutter.
cl_crosshairgap
Sets the distance between the center point and where each line begins.
- •Range: -50 to 50
- •Default: 1
- •Typical: -3 to 3
- •Impact: Negative values create overlapping lines, positive values create gaps
Recommendation: -2 to 1 for precision aiming. Many pros use -1 or 0.
cl_crosshairstyle
Defines the fundamental behavior and type of your crosshair.
- •0: Default (dynamic, spreads with movement and shooting)
- •1: Default Static (no movement or shooting expansion)
- •2: Classic (weapon accuracy affects crosshair)
- •3: Classic Dynamic (full dynamic feedback)
- •4: Classic Static (most popular among pros)
- •5: Classic Static with dot center
Recommendation: Style 4 or 5 for competitive play.
cl_crosshair_drawoutline
Adds a dark outline around your crosshair for improved visibility.
- •0: Disabled
- •1: Enabled (recommended)
Recommendation: Always enable (1) for maximum visibility against all backgrounds.
cl_crosshaircolor
Sets your crosshair color using predefined options or custom RGB values.
- •1: Green
- •2: Yellow
- •3: Blue
- •4: Cyan
- •5: Custom (requires RGB values)
Recommendation: Cyan (4) or custom RGB for optimal contrast.
cl_crosshairdot
Adds a center dot to your crosshair for enhanced precision.
- •0: No dot
- •1: Add center dot
Recommendation: Preference-based. Many precise aimers use dot (1).
cl_crosshairalpha
Controls the transparency/opacity of your crosshair.
- •Range: 0 to 255
- •Default: 255 (fully opaque)
- •Typical: 200-255
Recommendation: 255 for maximum visibility in critical moments.
Common Pro Player Settings Reference
| Player | Style | Size | Thickness | Gap | Color | Dot | Outline |
|---|---|---|---|---|---|---|---|
| s1mple | 4 | 3 | 1 | -3 | Yellow | No | Yes |
| NiKo | 4 | 4 | 0 | -2 | Cyan | No | Yes |
| ZywOo | 4 | 2 | 1 | -3 | Green | Yes | Yes |
| device | 4 | 3.5 | 1 | -1 | Cyan | No | Yes |
| m0NESY | 4 | 2 | 1 | -2 | Cyan | Yes | Yes |
| Twistzz | 4 | 3 | 1 | -1 | Yellow | No | Yes |
These settings are starting points. What works for professional players may need adjustment based on your monitor size, resolution, and personal preferences.
Finding Pro Player Crosshairs
One of the best ways to find a crosshair that works for you is to start with configurations used by professional CS2 players. These players have spent thousands of hours optimizing their setups for competitive performance.
Using the CS2Flow Crosshair Database
Our crosshair database provides a comprehensive collection of crosshair settings from professional players across all major CS2 teams and tournaments. The database includes:
- •Current pro player crosshairs with up-to-date settings
- •Both share codes and console commands for easy importing
- •Filter options by player, team, or crosshair style
- •Visual previews of how each crosshair appears
- •Quick copy buttons for instant importing
Why Copy Pro Player Crosshairs?
Starting with a professional player's crosshair offers several advantages:
- •Battle-tested configurations: These setups have been refined through thousands of hours of competitive play
- •Role-based options: Find crosshairs from pros who play similar positions (AWPer, entry fragger, lurker, etc.)
- •Proven performance: If it works at the highest level, it's likely to serve you well
- •Starting template: Use pro settings as a foundation, then adjust to your preferences
Popular Pro Player Crosshairs
s1mple's Crosshair: Known for its small, precise design perfect for rifling and AWPing. The negative gap creates a compact crosshair ideal for headshot-focused gameplay.
NiKo's Crosshair: Features a balanced size with minimal thickness, offering excellent visibility while maintaining precision. Popular among aim-focused riflers.
ZywOo's Crosshair: Combines a small crosshair with a center dot, providing both precision and a clear aiming point. Excellent for versatile players.
device's Crosshair: Slightly larger than most AWP-focused crosshairs, offering a good balance for players who switch between AWP and rifles.
Don't feel obligated to use a pro's crosshair exactly as-is. Many players find success by starting with a pro template and making small adjustments to fit their personal preferences and monitor setup.
Method 1: Import via Share Code (Recommended)
Share codes are the easiest and most reliable way to import crosshairs in CS2. They're short alphanumeric strings that encode all your crosshair settings into a single, shareable code.
What is a Share Code?
A crosshair share code is a compact string (example: CSGO-KJzH7-s9wY5-UhJ2Q-vTY8N-dZxRP) that contains all your crosshair configuration data. When you import a share code, CS2 automatically applies all the encoded settings without requiring you to manually enter multiple console commands.
Benefits of share codes:
- •Quick and easy to copy/paste
- •No risk of typos in command syntax
- •Can be shared via text, Discord, or social media
- •Single-action import process
- •Works identically across all CS2 installations
Step-by-Step Import Process
- •
Copy the share code from your source (CS2Flow database, friend, pro player profile, etc.)
- •
Launch Counter-Strike 2 and navigate to the main menu
- •
Open Settings by clicking the gear icon or pressing Esc
- •
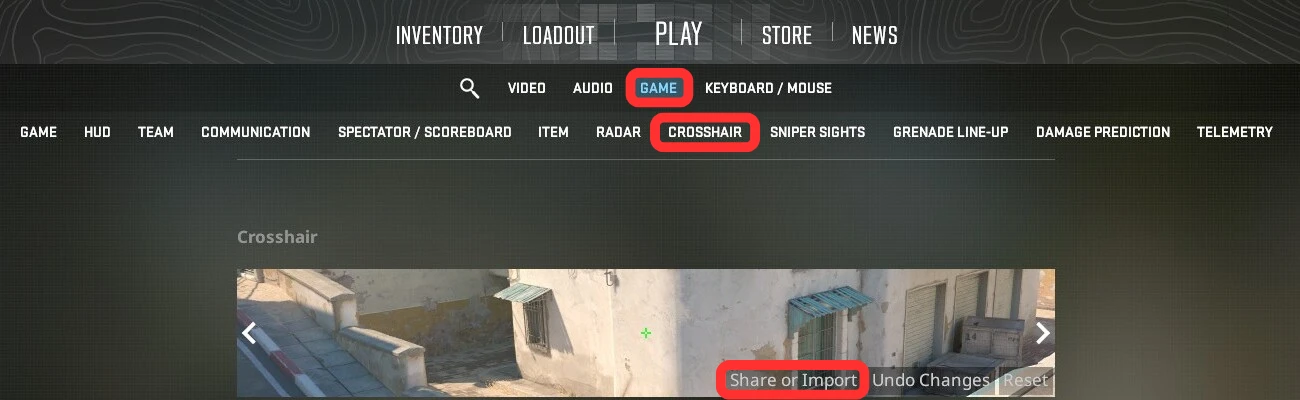
Navigate to Game Settings:
- •Click Settings
- •Select Game tab
- •Scroll down to Crosshair section
- •
Click "Share or Import" button in the crosshair settings panel
- •
Paste the share code into the import field
- •Use Ctrl + V to paste
- •The field accepts codes in format:
CSGO-XXXXX-XXXXX-XXXXX-XXXXX-XXXXX
- •
Click "Import" to apply the crosshair settings
- •
Verify the crosshair appears correctly in the preview window
The crosshair should now be active and ready to use. You can immediately see the changes in-game or test them in a practice match.
Common Share Code Import Errors
"Invalid Code" Error:
- •Ensure you copied the entire code without extra spaces
- •Verify the code follows the correct format
- •Try copying the code again from the source
Import Button Doesn't Respond:
- •Restart CS2 and try again
- •Ensure you're not in a competitive match
- •Check that the game is fully updated
Crosshair Doesn't Change:
- •Check if any custom console commands are overriding the import
- •Try using console method as an alternative
- •Verify your game files through Steam
Always copy share codes from trusted sources like CS2Flow or official pro player profiles. While share codes only contain crosshair data, it's good practice to verify sources.
Method 2: Import via Console Commands
Console commands provide an alternative method for importing crosshairs, offering more control and the ability to adjust individual settings. This method is particularly useful when you only have command strings or want to make specific customizations during import.
When to Use Console Commands
Best scenarios for console import:
- •You only have access to command strings (not share codes)
- •You want to apply specific settings individually
- •You need to troubleshoot why a share code isn't working
- •You want to quickly test small adjustments to existing crosshairs
- •You're comfortable with console commands and want precise control
Enabling the Developer Console
Before using console commands, you must enable the developer console:
- •Open Settings → Game → Game settings
- •Find Enable Developer Console option
- •Set to Yes
- •The console can now be opened with the ~ key (tilde, usually above Tab)
Step-by-Step Console Import
- •
Open the developer console by pressing ~
- •
Copy your crosshair commands. A typical crosshair command set looks like:
cl_crosshairsize 3;
cl_crosshairthickness 1;
cl_crosshairgap -2;
cl_crosshairstyle 4;
cl_crosshair_drawoutline 1;
cl_crosshaircolor 4;
cl_crosshairdot 0;
cl_crosshairalpha 255;- •
Paste the commands into the console
- •Use Ctrl + V to paste
- •Commands separated by semicolons (;) will execute in sequence
- •
Press Enter to execute all commands
- •
Verify no errors appear in the console output
- •Successful commands show no error messages
- •Invalid commands will display red error text
- •
Check your crosshair has updated visually
Running Multiple Commands Efficiently
You can execute multiple crosshair commands at once by separating them with semicolons:
cl_crosshairsize 4;
cl_crosshairthickness 1.5;
cl_crosshairgap -1;
cl_crosshairstyle 5This approach is much faster than entering each command individually and ensures all settings are applied simultaneously.
Verification Commands
After importing your crosshair via console, verify the settings were applied correctly:
- •
cl_crosshairsize– Check current size value - •
cl_crosshairstyle– Confirm style setting - •
cl_crosshaircolor– Verify color value
Simply type these commands without values to see the current setting.
Console commands require exact syntax. A single typo will cause the command to fail. Double-check your commands before executing, especially when manually typing settings.
The console method is actually more powerful than share codes in one respect: you can instantly adjust individual settings without affecting your entire crosshair configuration. This makes it perfect for fine-tuning.
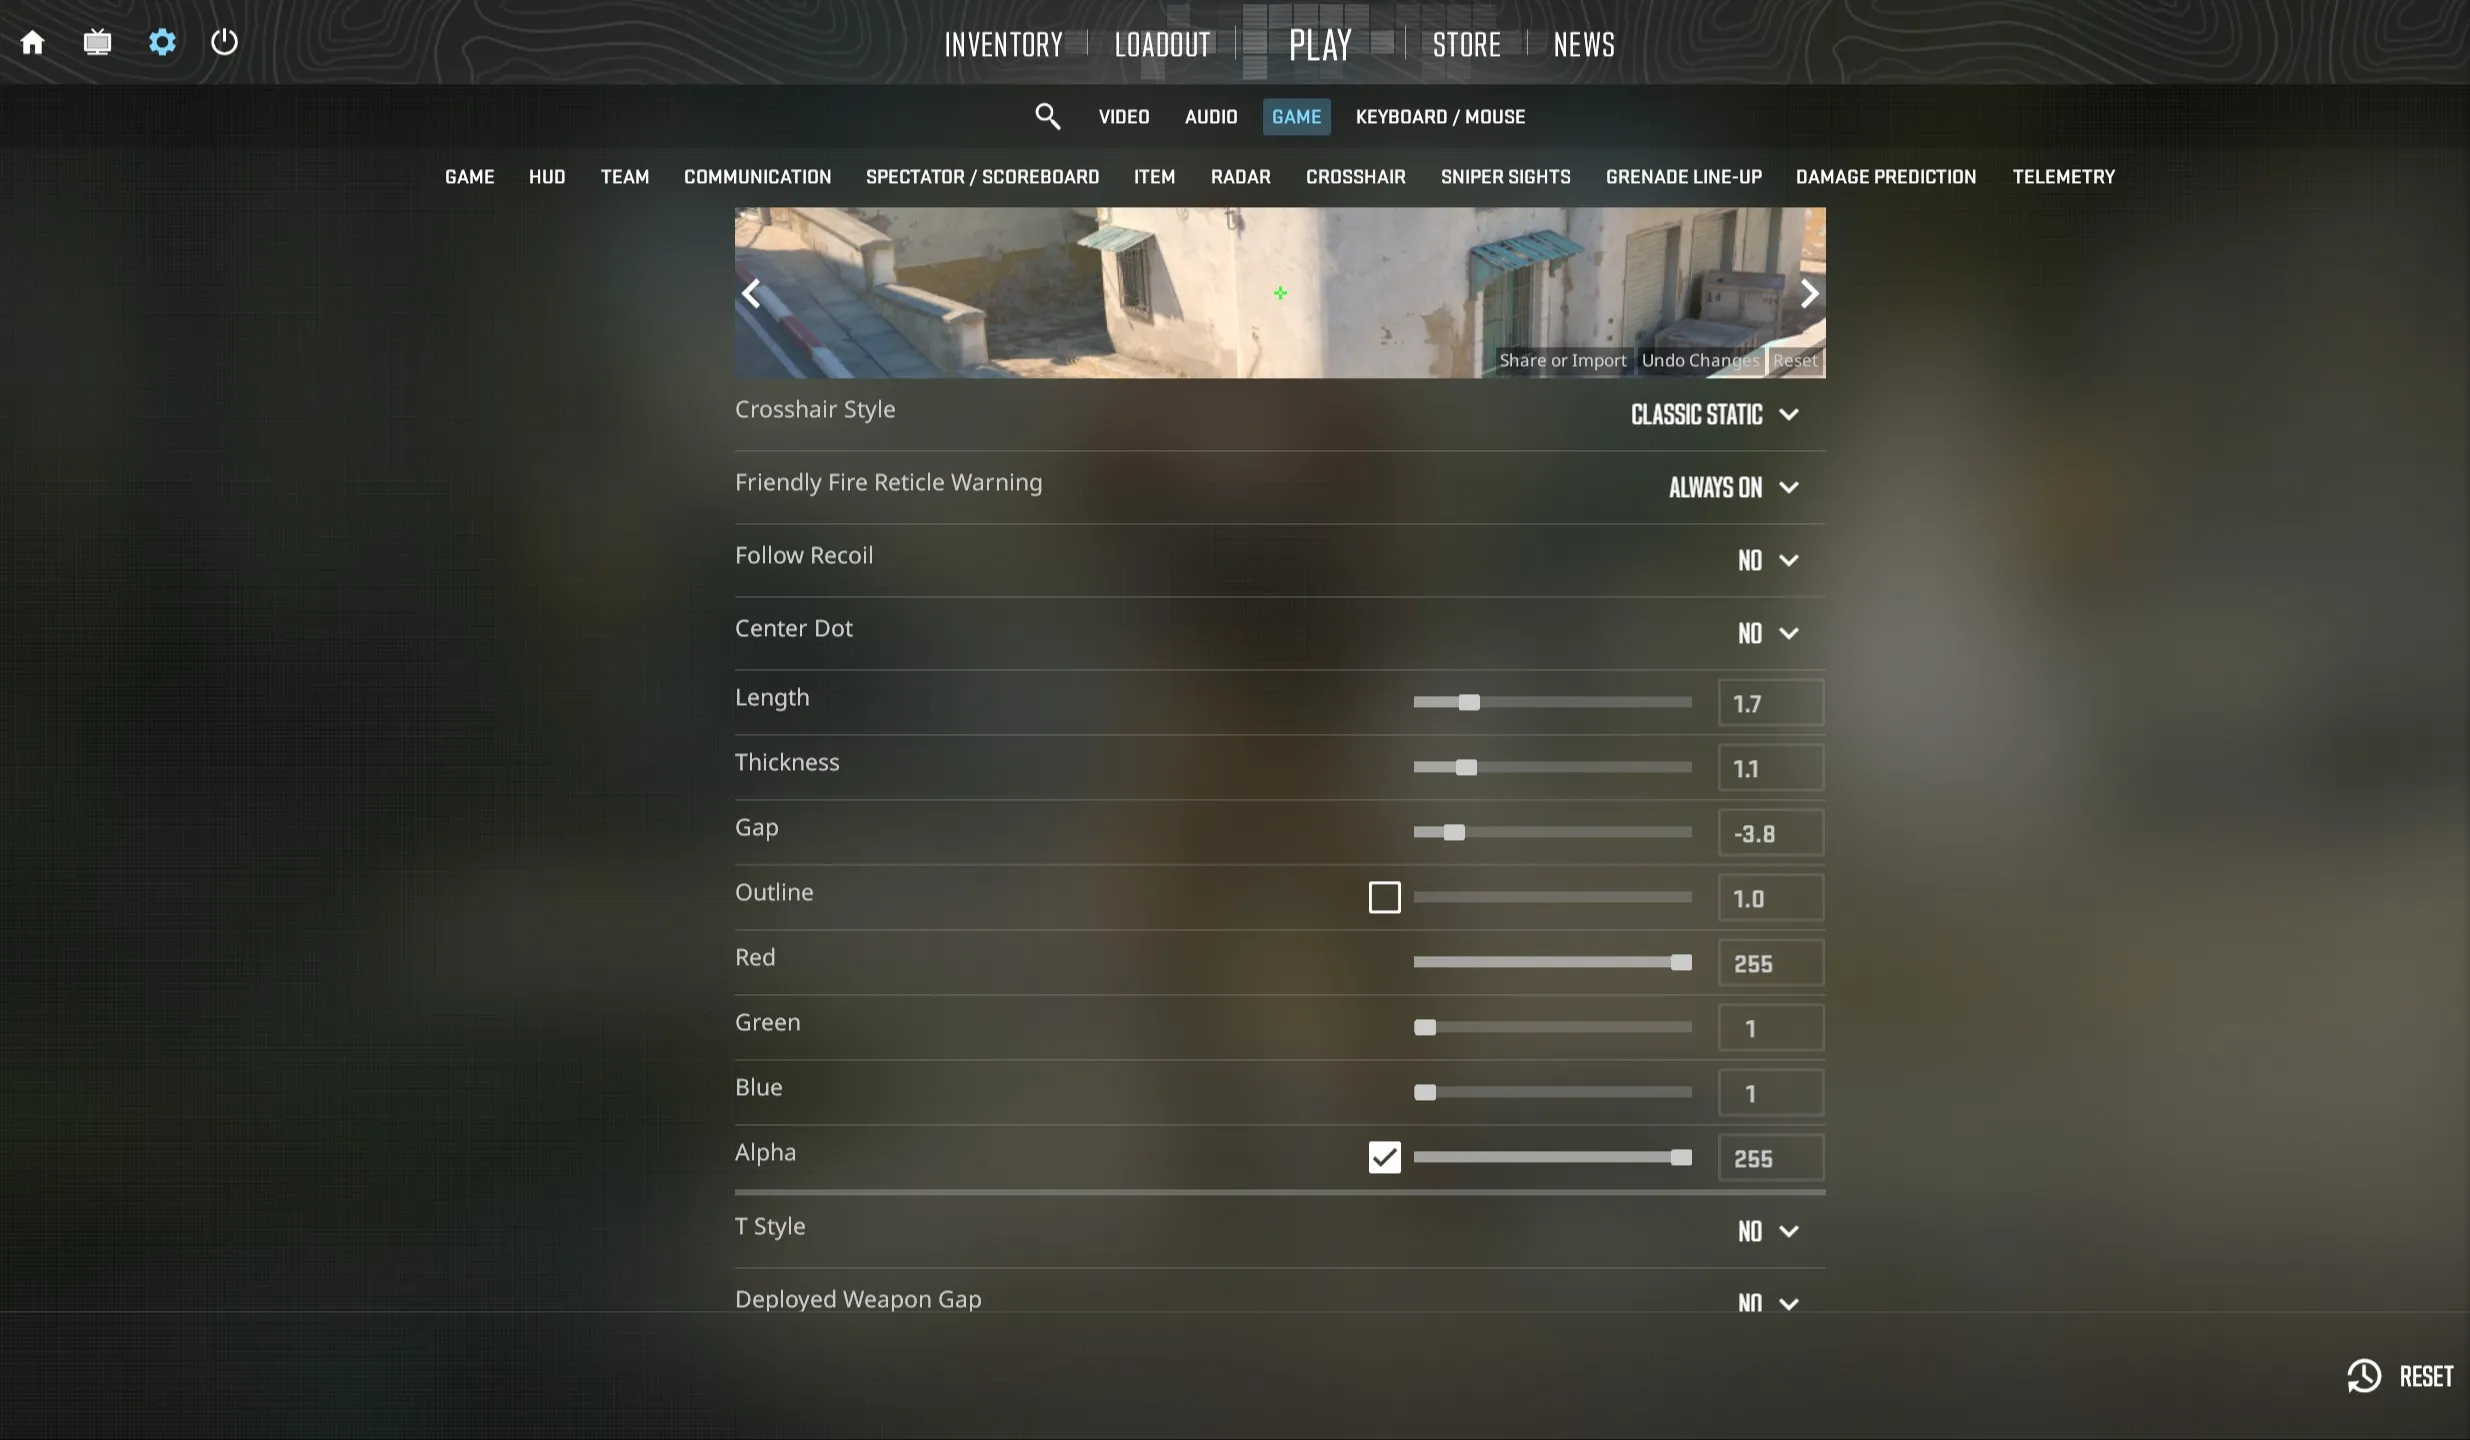
Using the In-Game Crosshair Editor
CS2's built-in crosshair editor provides a user-friendly interface for customizing your crosshair without memorizing console commands. It's perfect for visual learners and offers real-time previews of every adjustment.
Accessing the Crosshair Editor
- •Open Settings (press Esc or click the gear icon)
- •Navigate to Game tab
- •Scroll down to Crosshair section
- •All customization options appear in this panel
The editor displays a live preview of your crosshair against different backgrounds, helping you visualize how it will appear on various maps and surfaces.
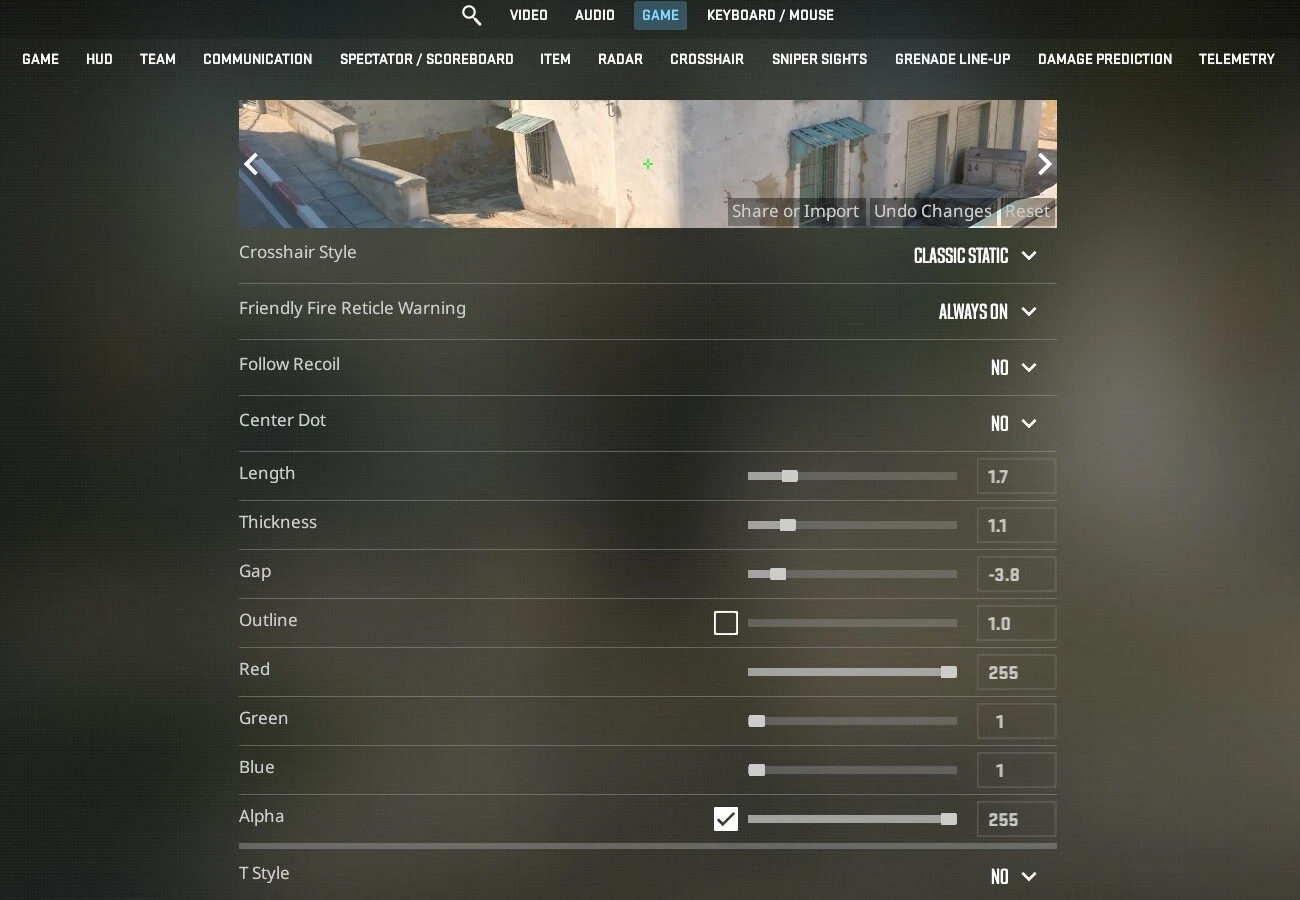
Customization Options Explained
Center Dot
- •Purpose: Adds a precise center point to your crosshair
- •Best for: Players who want maximum precision or use hybrid crosshairs
- •Toggle: Simple checkbox enable/disable
Length (Size)
- •Purpose: Controls how long each crosshair line extends
- •Slider range: Very short to very long
- •Visual impact: Longer lines provide more spray control reference but can obscure enemies
- •Recommendation: Start around mid-range (default 5) and adjust based on preference
Thickness
- •Purpose: Determines how thick each crosshair line appears
- •Slider range: Thin to thick
- •Visual impact: Thicker lines are more visible but reduce precision
- •Recommendation: 1-1.5 for balanced visibility and precision
Gap
- •Purpose: Sets the distance between center and where lines begin
- •Slider range: Negative (overlapping) to positive (gapped)
- •Visual impact: Negative values create compact crosshairs, positive values create open crosshairs
- •Recommendation: -2 to 1 for most players
Outline
- •Purpose: Adds a dark border around crosshair for better visibility
- •Options: On/Off toggle
- •Visual impact: Makes crosshair visible against any background
- •Recommendation: Always enable for competitive play
Color
- •Purpose: Changes crosshair color for optimal contrast
- •Options: Preset colors or custom RGB
- •Visual impact: Different colors work better on different maps
- •Recommendation: Cyan (4) has best overall visibility
Opacity (Alpha)
- •Purpose: Controls crosshair transparency
- •Slider range: Fully transparent to fully opaque
- •Visual impact: Lower opacity can reduce visual clutter but may be harder to see
- •Recommendation: Keep at maximum (255) for competitive play
Style
- •Purpose: Determines fundamental crosshair behavior
- •Options: Default, Default Static, Classic, Classic Dynamic, Classic Static (4), Classic Static with Dot (5)
- •Visual impact: Completely changes how crosshair responds to movement and shooting
- •Recommendation: Style 4 or 5 for competitive players
Real-Time Preview Benefits
The editor's live preview system lets you:
- •See changes instantly without entering a match
- •Test against multiple backgrounds to ensure visibility
- •Compare different configurations side-by-side
- •Experiment risk-free before committing to settings
Fine-Tuning After Import
Even after importing a pro player's crosshair via share code, the in-game editor is perfect for minor adjustments:
- •Import the base crosshair using share code
- •Open the crosshair editor
- •Make small adjustments to size, gap, or color
- •Preview changes in real-time
- •Save your customized version
This workflow combines the convenience of share codes with the precision of manual customization.
The in-game editor is the best tool for beginners and experienced players alike. Don't be afraid to spend 15-20 minutes experimenting with different configurations to find what feels right for you.
Advanced Crosshair Customization
Once you're comfortable with basic crosshair settings, advanced customization options allow you to create highly specialized configurations optimized for specific weapons, playstyles, or visual preferences.
RGB Color Customization
While CS2 provides preset colors, custom RGB values offer unlimited color options for perfect visibility on your favorite maps.
Setting custom RGB colors:
cl_crosshaircolor 5
cl_crosshaircolor_r 255
cl_crosshaircolor_g 0
cl_crosshaircolor_b 255This example creates a purple crosshair. Adjust R, G, B values (0-255) to create any color.
Popular custom color combinations:
- •Hot Pink: R G B (excellent visibility on most maps)
- •Bright Orange: R G B (stands out on dark backgrounds)
- •Lime Green: R G B (classic high-visibility option)
- •Neon Cyan: R G B (extremely visible across all maps)
Outline Thickness Customization
Beyond basic outline enable/disable, you can control outline thickness for enhanced visibility:
cl_crosshair_drawoutline 1
cl_crosshair_outlinethickness 1Thickness values:
- •0.5: Thin outline, minimal visual weight
- •1: Standard outline (recommended)
- •2: Thick outline, maximum visibility at cost of some precision
- •3: Very thick, best for low-resolution displays
Dynamic Gap Adjustments
The crosshair gap can be dynamically adjusted based on weapon accuracy using split distance:
cl_crosshair_dynamic_splitdist 7This setting controls how far the crosshair lines spread during movement when using dynamic styles. Lower values create tighter movement feedback, higher values create more dramatic spreading.
Recommended values:
- •4-6: Subtle feedback, minimal distraction
- •7-10: Standard feedback (default)
- •11-15: Exaggerated feedback, best for learning movement mechanics
Weapon-Specific Crosshairs (Advanced)
Advanced players can configure different crosshairs for different weapon types using autoexec configurations:
alias "rifleXhair" "
cl_crosshairsize 3;
cl_crosshairgap -2;
cl_crosshairdot 0;"
alias "awpXhair" "
cl_crosshairsize 1;
cl_crosshairgap 0;
cl_crosshairdot 1;"
alias "pistolXhair" "
cl_crosshairsize 4;
cl_crosshairgap -1;
cl_crosshairdot 0"
bind "1" "slot1; rifleXhair"
bind "2" "slot2; pistolXhair"
bind "3" "slot3"
bind "AWP" "awpXhair"This setup automatically switches crosshair configurations when you change weapons. Most competitive players don't use this due to consistency concerns, but it can be useful for role players who specialize in specific weapons.
T-Style and Split Crosshairs
CS2 supports T-style crosshairs (without top line) using advanced console settings:
cl_crosshair_t 1This removes the top line, creating an upside-down T shape. Some players prefer this for unobstructed upward vision when holding angles.
Crosshair Sniper Width
When scoped with sniper rifles, you can customize the scoped crosshair gap:
cl_crosshair_sniper_width 1Values:
- •1: Thin sniper crosshair (default, recommended for precision)
- •2-3: Thicker sniper crosshair (easier to see, less precise)
Advanced customization should enhance your gameplay, not distract from it. Make changes incrementally and test each adjustment in actual games before adding more complexity.
Crosshair Color Psychology
Crosshair color isn't just aesthetic—it directly impacts visibility, eye strain, and your ability to track targets across different map environments. Understanding color theory helps you choose the optimal color for your playstyle and preferred maps.
Visibility and Contrast
Your crosshair color must provide maximum contrast against the most common backgrounds in CS2:
High-contrast colors:
- •Cyan/Aqua: Excellent against brown/gray environments (Dust2, Mirage)
- •Yellow: Great against dark areas and shadows
- •Green: Good all-purpose visibility, easy on eyes
- •Magenta/Pink: Outstanding on nearly all backgrounds
Lower-contrast colors:
- •Red: Can blend with blood effects and some map elements
- •Blue: Disappears against sky and certain map textures
- •White: Often blends with bright areas and smokes
Map-Specific Considerations
Different CS2 maps have distinct color palettes that affect crosshair visibility:
Dust2 (sandy/brown tones):
- •Best: Cyan, Magenta, Green
- •Avoid: Orange, Brown, Red
Inferno (warm/orange tones):
- •Best: Cyan, Blue, Green
- •Avoid: Yellow, Orange, Red
Nuke (gray/industrial):
- •Best: Cyan, Yellow, Magenta
- •Avoid: Gray, White (blends with metal)
Mirage (varied palette):
- •Best: Cyan, Green (universal visibility)
- •Avoid: Sand-tones, brown
Ancient (green/stone):
- •Best: Magenta, Cyan, Yellow
- •Avoid: Green (blends with vegetation)
Eye Strain and Comfort
Long gaming sessions make eye comfort crucial:
Low eye strain colors:
- •Green: Easiest color for human eyes to process
- •Cyan: Minimal eye fatigue, excellent visibility
- •Soft Yellow: Warm but not harsh
Higher eye strain colors:
- •Bright Red: Can cause eye fatigue over time
- •Pure White: Can be harsh in darker areas
- •Neon colors: May cause more strain but offer visibility
Popular Pro Player Color Choices
Analyzing professional player preferences reveals clear trends:
Cyan (Most Popular - 45%)
- •Best all-around visibility
- •Works on every map
- •Professional, clean appearance
Yellow (30%)
- •Excellent in dark areas
- •Warm, comfortable for eyes
- •Traditional choice
Green (15%)
- •Classic CS choice
- •Easy on eyes
- •Good contrast on most maps
Custom/Other (10%)
- •Magenta, pink, custom RGB
- •Players seeking maximum contrast
- •Personal preference variations
Custom RGB for Perfect Visibility
Create your optimal color using RGB customization. Test your color on aim training maps across different backgrounds:
cl_crosshaircolor 5
cl_crosshaircolor_r 0
cl_crosshaircolor_g 255
cl_crosshaircolor_b 255Testing your color choice:
- •Load into different maps (Dust2, Mirage, Nuke, Inferno)
- •Look at common holding angles and backgrounds
- •Ensure crosshair remains clearly visible
- •Test in different lighting conditions
- •Verify visibility through smokes and utility
Many professional players use different crosshair colors for different maps, adjusting based on the dominant color palette. Consider creating map-specific configurations if you're serious about optimization.
Creating Your Perfect Crosshair
While copying pro player crosshairs provides an excellent starting point, creating a personalized crosshair tailored to your exact preferences, playstyle, and setup will ultimately serve you best. Here's a systematic approach to crafting your ideal crosshair.
Starting from a Pro Template
Begin with a professional player's crosshair that matches your role:
Entry Fraggers: Try s1mple or NiKo's crosshairs (small, precise, static) AWP Players: Consider device or m0NESY's crosshairs (minimal, often with dot) Support Players: Look at ZywOo or rain's crosshairs (balanced, versatile) IGL/Anchor: Try karrigan or Xyp9x's crosshairs (clear, functional)
Import your chosen template using the share code method from our crosshairs database, then proceed with customization.
Systematic Adjustment Process
Follow this step-by-step process to refine your crosshair:
Step 1: Test the baseline
- •Use the imported pro crosshair for 2-3 matches
- •Note any visibility or precision issues
- •Pay attention to moments when the crosshair helped or hindered you
Step 2: Adjust size first
- •If you struggled to see the crosshair: increase size by 0.5-1
- •If the crosshair obscured enemies: decrease size by 0.5-1
- •Test for 3-5 rounds, repeat until comfortable
Step 3: Fine-tune gap
- •If you want more precision: decrease gap by 1
- •If you want better spray control reference: increase gap by 1
- •Negative gaps (-1 to -3) work well for headshot-focused players
Step 4: Thickness adjustment
- •If crosshair is hard to see: increase thickness by 0.5
- •If crosshair feels chunky: decrease thickness by 0.5
- •Balance between visibility and precision
Step 5: Color optimization
- •Test on your most-played maps
- •Ensure visibility in common spots (mid on Mirage, tunnels on Dust2, etc.)
- •Consider custom RGB if presets don't work
Step 6: Outline and dot decisions
- •Always enable outline for competitive play
- •Add center dot if you want extra precision
- •Test with and without dot over 5+ matches
Testing Methodology
Effective testing is crucial for finding your perfect crosshair:
Practice Mode Testing:
- •Load
map de_miragein offline mode - •Stand in different locations (mid, A site, palace)
- •Practice pre-aiming common angles
- •Test spray control against walls
- •Note visibility in shadows and bright areas
Aim Training Maps: Use Steam Workshop aim training maps for controlled testing:
- •aim_botz: Test static target acquisition
- •Yprac Practice & Warmup: Test realistic pre-aim scenarios
- •Fast Aim/Reflex: Test crosshair tracking
- •Training Center: Test various situations
Actual Match Testing: After practice testing, use your crosshair in:
- •5-10 casual/deathmatch games
- •3-5 competitive matches
- •Various maps and positions
Track your stats (headshot percentage, K/D ratio) compared to your baseline with the original crosshair.
Iterative Refinement
Crosshair optimization is an ongoing process:
Week 1: Test base pro player crosshair Week 2: Make major adjustments (size, gap, color) Week 3: Fine-tune details (thickness, dot, outline) Week 4: Finalize settings and commit to consistency
Make only 1-2 adjustments at a time so you can clearly identify what helps or hurts your performance.
When to Stop Adjusting
You've found your perfect crosshair when:
- •You consistently see the crosshair clearly across all maps
- •Your confidence in aim duels feels natural
- •You don't think about your crosshair during matches
- •Your headshot percentage is stable or improving
- •You can pre-aim and track enemies comfortably
- •The crosshair feels like a natural extension of your aim
Remember: consistency beats perfection. Once you find a crosshair that works 90% as well as you imagine possible, stop adjusting and commit. Constantly changing crosshairs disrupts muscle memory and hurts performance.
Saving and Sharing Your Crosshair
Once you've created your perfect crosshair, it's important to save it properly so you never lose your settings. Additionally, sharing your crosshair with teammates or friends is simple with the right methods.
Generating Your Share Code
To create a shareable code for your current crosshair:
- •Open Settings → Game → Crosshair
- •Click "Share or Import" button
- •Your current crosshair's share code appears in the field
- •Click "Copy" or manually select and copy the code
- •Store the code in a safe location (text file, notes app, Discord DM to yourself)
The share code format looks like: CSGO-KJzH7-s9wY5-UhJ2Q-vTY8N-dZxRP
Best practices for storing share codes:
- •Save in a text file named
crosshairs.txtin your CS2 config folder - •Add to your Steam profile description for easy access
- •Send to yourself in Discord or email
- •Create backups in multiple locations
Exporting Console Commands
For more granular control or sharing specific settings, export your crosshair as console commands:
- •Open the developer console (~)
- •Type each setting command without a value to display current settings:
cl_crosshairsize
cl_crosshairthickness
cl_crosshairgap
cl_crosshairstyle
cl_crosshair_drawoutline
cl_crosshaircolor
cl_crosshairdot
cl_crosshairalpha- •Note the current values
- •Create a command string combining all settings:
cl_crosshairsize 3;
cl_crosshairthickness 1;
cl_crosshairgap -2;
cl_crosshairstyle 4;
cl_crosshair_drawoutline 1;
cl_crosshaircolor 4;
cl_crosshairdot 0;
cl_crosshairalpha 255;This command string can be executed at any time to restore your crosshair settings.
Autoexec File Persistence
The most reliable way to ensure your crosshair persists across CS2 updates and reinstalls is saving it in your autoexec.cfg file:
Creating/editing autoexec.cfg:
- •
Navigate to your CS2 config folder:
C:\Program Files (x86)\Steam\steamapps\common\Counter-Strike Global Offensive\game\csgo\cfg\ - •
Create a file named
autoexec.cfg(if it doesn't exist) - •
Open the file in a text editor
- •
Add your crosshair commands:
// My Perfect Crosshair
cl_crosshairsize 3
cl_crosshairthickness 1
cl_crosshairgap -2
cl_crosshairstyle 4
cl_crosshair_drawoutline 1
cl_crosshaircolor 4
cl_crosshairdot 0
cl_crosshairalpha 255
// Optional: Additional settings
cl_crosshaircolor_r 0
cl_crosshaircolor_g 255
cl_crosshaircolor_b 255
echo "Crosshair loaded successfully"- •
Save the file
- •
In CS2, open console and type:
exec autoexec.cfg - •
Verify settings loaded by checking console for "Crosshair loaded successfully"
Ensuring autoexec runs on launch:
Add to your CS2 launch options (Steam → Right-click CS2 → Properties → Launch Options):
+exec autoexec.cfgThis ensures your crosshair and other settings load automatically every time you start CS2.
Sharing with Teammates
Share your crosshair with friends or teammates easily:
Method 1: Share Code (Fastest)
- •Simply send your share code via Discord, Steam chat, or text
- •They import using Settings → Game → Crosshair → Share or Import
Method 2: Console Commands
- •Send your command string
- •They paste it into console for instant application
Method 3: Screenshot + Settings
- •Take a screenshot of your crosshair
- •List the key settings (size, gap, thickness, color, style)
- •Let them recreate it manually in the editor
When sharing crosshairs, include a screenshot showing how it looks in-game. Settings alone don't convey the visual feel, and teammates can better decide if they want to try your configuration.
Testing Your New Crosshair
After importing or creating a new crosshair, proper testing ensures it actually improves your performance before you commit to using it in ranked matches. A systematic testing approach helps you objectively evaluate whether your new crosshair works for you.
Offline Practice Testing
Start with offline testing to get familiar with your new crosshair in a controlled environment:
Loading an offline match:
- •Open the developer console (~)
- •Type
map de_mirage(or your preferred map) - •Press Enter to load the map
Initial checks:
- •Look at different backgrounds (walls, sky, ground, props)
- •Verify the crosshair is visible in shadows and bright areas
- •Check that the size doesn't obscure enemies at medium-long range
- •Practice basic crosshair placement on common angles
- •Test spray control against a wall to ensure reference lines work well
Aim Training Workshop Maps
Steam Workshop offers excellent maps for structured crosshair testing:
Recommended testing maps:
aim_botz - Best for static aim testing
- •Spawn bots and practice one-taps
- •Test headshot accuracy with new crosshair
- •Compare your average kills per minute to your baseline
- •Focus on how quickly you acquire targets
Yprac Practice & Warmup - Realistic scenario testing
- •Practice pre-aiming with your new crosshair
- •Test holding angles and reaction times
- •Verify crosshair placement feels natural
- •Check visibility during movement
Training Center - Comprehensive testing
- •Spray control challenges
- •Tracking tests
- •Precision drills
- •Compare scores to your previous crosshair
Fast Aim/Reflex Training - Speed testing
- •Rapid target acquisition
- •Flick shot accuracy
- •Reaction time measurement
- •High-pressure crosshair visibility
Adjustment Period Expectations
Understand that any crosshair change requires an adjustment period:
Day 1-2: Crosshair feels unfamiliar
- •Aim might feel "off"
- •Spray control may suffer initially
- •This is completely normal
Day 3-5: Adaptation begins
- •Muscle memory starts adjusting
- •Performance returns to baseline
- •You begin noticing benefits or issues
Week 2: Full adjustment
- •New crosshair feels natural
- •Clear picture of performance impact
- •Valid time to make final judgment
Critical rule: Don't judge a new crosshair in the first 24 hours. Your brain needs time to recalibrate muscle memory.
Performance Monitoring
Track objective metrics to determine if your new crosshair improves your gameplay:
Stats to monitor:
- •Headshot percentage (HSP%)
- •Average kills per round (KPR)
- •First kill frequency
- •Win rate in duels
- •K/D ratio
Compare these stats across 10+ matches with your old crosshair vs. 10+ matches with your new crosshair.
Subjective factors to consider:
- •Do you feel more confident in aim duels?
- •Are you landing more headshots in practice?
- •Does the crosshair help or hinder spray control?
- •Can you see the crosshair clearly in critical moments?
- •Does your aim feel more consistent?
When to Switch Back
Consider reverting to your previous crosshair if:
- •After 2 weeks, your stats have declined consistently
- •You constantly think about your crosshair during matches (distraction)
- •Visibility issues persist on your most-played maps
- •You're less confident in duels than before
- •Your headshot percentage drops significantly
There's no shame in returning to what works. Some players use the same crosshair for years because consistency trumps optimization.
Deathmatch Testing
Before taking a new crosshair into ranked:
- •Play 5-10 deathmatch sessions with the new crosshair
- •Focus on different weapons (rifles, pistols, AWP)
- •Test on multiple maps
- •Practice pre-aiming and holding angles
- •Ensure muscle memory is adapting
Deathmatch provides high-repetition, low-stakes testing perfect for crosshair adjustment.
Give your new crosshair a fair chance—at least 10 matches and one week. If it still doesn't feel right after genuine testing, that's valuable information. Some crosshairs look great on paper but don't match your personal aiming style.
Common Crosshair Mistakes to Avoid
Many players unknowingly sabotage their aim by making poor crosshair choices. Avoiding these common mistakes will help you maintain optimal crosshair settings and improve your competitive performance.
Overly Large or Cluttered Crosshairs
The mistake: Using a crosshair with excessively long lines (size 8+) or extremely thick lines that obscure enemy models.
Why it's bad:
- •Large crosshairs physically block your vision of enemy heads
- •Cluttered crosshairs make precision aiming more difficult
- •Excessive size provides no additional benefit for accuracy
- •Harder to track small movements and minor adjustments
Solution:
Keep cl_crosshairsize between 1-5. Most professionals use 2-4 for a reason—it's precise without being invisible. If you need better visibility, adjust color and outline instead of size.
Poor Color Choices
The mistake: Choosing crosshair colors that blend with common map elements (red, blue, white, or map-specific colors).
Why it's bad:
- •Red crosshairs disappear in blood effects
- •Blue crosshairs vanish against sky and certain textures
- •White crosshairs blend with bright areas and smokes
- •Map-colored crosshairs (green on Ancient) reduce visibility
Solution: Stick with high-contrast colors: cyan, yellow, or magenta. Enable crosshair outline (cl_crosshair_drawoutline 1) for guaranteed visibility on all backgrounds.
Changing Crosshairs Too Frequently
The mistake: Switching crosshairs every few days or after every bad game, constantly seeking the "perfect" setup.
Why it's bad:
- •Disrupts muscle memory and aim consistency
- •Each change requires 1-2 weeks of adjustment
- •Creates mental distraction during matches
- •Makes it impossible to objectively evaluate performance
- •Often a psychological crutch avoiding actual practice
Solution: Commit to a crosshair for at least 2-3 weeks. Make changes only after careful testing and objective performance analysis. Remember: consistency beats optimization.
If you find yourself changing crosshairs every week, the problem isn't your crosshair—it's your mindset. Focus on improving aim fundamentals rather than chasing the perfect settings.
Copying Without Testing
The mistake: Importing a pro player's crosshair and immediately using it in ranked matches without testing or adjustment.
Why it's bad:
- •Pro settings are optimized for their monitors, resolutions, and preferences
- •What works for s1mple might not work for your setup
- •No adjustment period means poor initial performance
- •May not match your role or playstyle
- •Can lead to unnecessary discouragement
Solution: Use pro crosshairs as starting templates, not final solutions. Test in offline mode and deathmatch before ranked. Make small adjustments to fit your preferences and setup.
Ignoring Outline Settings
The mistake: Disabling crosshair outline or never enabling it in the first place.
Why it's bad:
- •Crosshair becomes nearly invisible on certain backgrounds
- •Reduces consistency of visibility across maps
- •Makes crosshair harder to track during fast movements
- •Provides no performance benefit to disable
Solution:
Always enable outline: cl_crosshair_drawoutline 1. There's virtually no downside, and it dramatically improves visibility across all scenarios.
Using Dynamic Crosshairs in Competitive
The mistake: Playing competitive matches with dynamic crosshair styles that expand during movement and shooting.
Why it's bad:
- •Creates visual distraction during critical moments
- •Makes spray control harder to learn by feel
- •Encourages over-reliance on visual feedback instead of muscle memory
- •Professionals use static crosshairs almost universally (95%+)
Solution:
Use cl_crosshairstyle 4 (Classic Static) for competitive play. Dynamic crosshairs are useful for learning, but static crosshairs are superior for performance once you understand game mechanics.
Neglecting Dot Crosshair Options
The mistake: Never trying a center dot crosshair or dismissing it without testing.
Why it's bad:
- •Dot crosshairs excel for precision aiming
- •Combined with regular crosshair (style 5), dots provide extra precision without visibility loss
- •Many top AWPers and aimers use dots
- •Missing out on a potentially superior option
Solution:
Test cl_crosshairstyle 5 (static with dot) for at least a week. The combination of lines and center dot offers the best of both worlds for many players.
Matching Teammates Without Consideration
The mistake: Using the exact same crosshair as your teammates or friends simply for uniformity.
Why it's bad:
- •Everyone has different visual preferences and aiming styles
- •Different roles benefit from different crosshair types
- •Your monitor and resolution may differ from teammates
- •Individual optimization always beats conformity
Solution: While teammates can inspire crosshair choices, always test and adjust for your personal needs. Your AWPer might use a dot, but if you're a rifler, you might need something different.
The biggest mistake of all: believing the perfect crosshair will dramatically improve your rank. Crosshair optimization provides 5-10% improvement at most. The real work is aim training, game sense, and consistent practice.
Troubleshooting Crosshair Issues
Even with careful setup, you might encounter issues with your crosshair import or configuration. This section covers common problems and their solutions.
Crosshair Not Appearing
Problem: Your crosshair is completely invisible in-game.
Possible causes and solutions:
Alpha set to 0:
- •Open console and type:
cl_crosshairalpha 255 - •This resets crosshair opacity to fully visible
Crosshair disabled:
- •Check console command:
crosshair 1 - •Ensure it's enabled
Resolution/scaling issues:
- •Verify game resolution matches your monitor's native resolution
- •Check in Settings → Video → Display Mode (use Fullscreen, not Windowed)
Verify game files:
- •Open Steam → Right-click CS2 → Properties → Installed Files → Verify integrity
Share Code Import Fails
Problem: Clicking "Import" with a valid share code doesn't work or shows an error.
Solutions:
Copy the entire code:
- •Ensure you copied the full share code including all dashes
- •Format should be:
CSGO-XXXXX-XXXXX-XXXXX-XXXXX-XXXXX - •Remove any extra spaces before or after
Restart CS2:
- •Completely close and relaunch the game
- •Try the import process again
Use console method instead:
- •If share codes consistently fail, use console commands as an alternative
- •See Method 2: Import via Console Commands
Update CS2:
- •Ensure your game is fully updated through Steam
- •Outdated versions may have import bugs
Console Commands Not Working
Problem: Entering crosshair commands in console shows errors or doesn't apply changes.
Solutions:
Enable developer console:
- •Settings → Game → Game Settings → Enable Developer Console → Yes
- •Access console with ~ key
Check command syntax:
- •Ensure commands are spelled correctly:
cl_crosshairsize 3notcrosshairsize 3 - •Commands are case-sensitive
- •Use semicolons to separate multiple commands:
cl_crosshairsize 3; cl_crosshairstyle 4
Remove spaces around values:
- •Correct:
cl_crosshairsize 3 - •Incorrect:
cl_crosshairsize 3(extra space)
Verify command validity:
- •Some commands may have been removed or changed in updates
- •Type the command name without a value to see if it exists:
cl_crosshairsize
Crosshair Resets After Restart
Problem: Your custom crosshair settings disappear every time you close and reopen CS2.
Solutions:
Save to autoexec.cfg:
// Add to autoexec.cfg in cfg folder
cl_crosshairsize 3
cl_crosshairthickness 1
cl_crosshairgap -2
cl_crosshairstyle 4
// ... other settingsAdd launch option:
- •Steam → Right-click CS2 → Properties → Launch Options
- •Add:
+exec autoexec.cfg
Generate and save share code:
- •Create a share code from your settings
- •Save it in multiple places for easy re-import
Check for config conflicts:
- •Remove any old config files that might be overriding settings
- •Look for conflicting autoexec or config files
Developer Console Won't Enable
Problem: You can't open the developer console even with ~ key.
Solutions:
Enable in settings:
- •Settings → Game → Game Settings → Enable Developer Console → Yes
Check keybind:
- •Settings → Keyboard/Mouse → scroll to "Console" keybind
- •Ensure it's bound to ~ or another accessible key
Keyboard layout issues:
- •On non-US keyboards, the console key might be different
- •Try §, ½, or keys near Tab
- •Manually rebind console to an easier key
Autoexec Not Loading
Problem: Your autoexec.cfg file doesn't execute automatically when CS2 starts.
Solutions:
Verify file location:
- •Correct path:
steamapps/common/Counter-Strike Global Offensive/game/csgo/cfg/ - •File must be named exactly:
autoexec.cfg(not autoexec.cfg.txt)
Add launch option:
- •Steam → Right-click CS2 → Properties → Launch Options:
+exec autoexec.cfg
Manual execution:
- •Open console and type:
exec autoexec.cfg - •This forces immediate execution
Check file format:
- •Save as plain text file with
.cfgextension - •Don't use Word or rich text editors (use Notepad, Notepad++, or VSCode)
Add echo confirmation:
- •Add to end of autoexec:
echo "Autoexec loaded successfully" - •Check console on launch for this message
Troubleshooting Table
| Problem | Most Common Cause | Quick Solution | Prevention |
|---|---|---|---|
| Crosshair invisible | Alpha set to 0 | cl_crosshairalpha 255 | Save settings to autoexec |
| Share code fails | Incomplete code copy | Copy entire code, restart CS2 | Use console method as backup |
| Settings reset | No autoexec file | Create autoexec.cfg with settings | Add launch option |
| Console won't open | Not enabled in settings | Settings → Enable Developer Console | Rebind to easy key |
| Commands cause errors | Typos or invalid syntax | Check spelling, use semicolons | Copy-paste from verified sources |
| Autoexec not loading | Wrong file location | Verify cfg folder location | Add echo confirmation |
If problems persist after trying these solutions, verify your game files through Steam and consider asking for help on CS2 community forums or the CS2Flow Discord with specific error messages.
Closing Notes
By following this comprehensive guide, you now have the knowledge and tools to import, customize, and optimize your CS2 crosshair for maximum competitive performance. Whether you chose to start with a professional player's configuration or built your perfect crosshair from scratch, remember that consistency and confidence are more valuable than perfection.
Key Takeaways
The right crosshair:
- •Improves target acquisition and headshot accuracy
- •Builds confidence in aim duels
- •Provides consistent visual reference for spray control
- •Enhances crosshair placement and pre-aim habits
Import methods:
- •Use share codes for quick, error-free importing
- •Use console commands for precise control and adjustments
- •Use the in-game editor for visual customization and testing
Optimization principles:
- •Start with proven pro player templates
- •Make incremental adjustments, one setting at a time
- •Test thoroughly before committing to changes
- •Prioritize consistency over constantly seeking "better" settings
Common pitfalls to avoid:
- •Changing crosshairs too frequently
- •Using overly large or cluttered designs
- •Choosing poor color contrasts
- •Neglecting outline settings
- •Skipping the adjustment period
Your Crosshair Journey
Remember that finding your perfect crosshair is a journey, not a destination. Professional players adjust their settings over time as their playstyle evolves, their roles change, or they simply discover new preferences. Give yourself permission to experiment, but also recognize when you've found something that works and commit to it.
The crosshair is just one element of aim optimization. Combine your new crosshair with:
- •Regular aim training (DM, aim maps, retake servers)
- •Consistent practice schedule
- •FPS optimization for smooth gameplay
- •Proper mouse sensitivity and settings
- •Custom binds for improved utility usage
Next Steps
Now that you've mastered crosshair importing and customization:
- •Practice consistently with your new crosshair for at least 2 weeks
- •Track your performance using headshot percentage and K/D statistics
- •Explore our crosshair database to discover more pro configurations
- •Experiment with advanced customization once you're comfortable with basics
- •Share your crosshair with teammates and friends who are looking for new configurations
Visit our crosshairs page for a constantly updated database of professional player crosshairs, complete with share codes and console commands for instant importing.
Check out our crosshair console commands database for additional performance and gameplay optimization commands that complement your crosshair settings.
Congratulations on taking control of your CS2 crosshair! With the right crosshair dialed in and consistent practice, you're well on your way to improved aim and better competitive performance. Remember: the best crosshair is the one you're confident using. Now get out there and land those headshots!